When using the code block, I cannot get it back to normal text mode.
When you're done adding code to the code block, you can tap the down arrow to leave code editing mode and revert back to normal text.
Ticksy supports the Envato Market API to add your products and verify customers and their purchases. Here's what needs to be done to set this up correctly.
CONNECT TICKSY TO ENVATO:
- Go to your Ticksy System Settings page. This is located under the gear icon in the header bar (when logged in as an administrator).
- Click on the Envato Integration tab near the bottom of the left side navigation.
- Click the big Connect to Envato button to connect your Ticksy account to Envato. A few notes regarding the required API data:
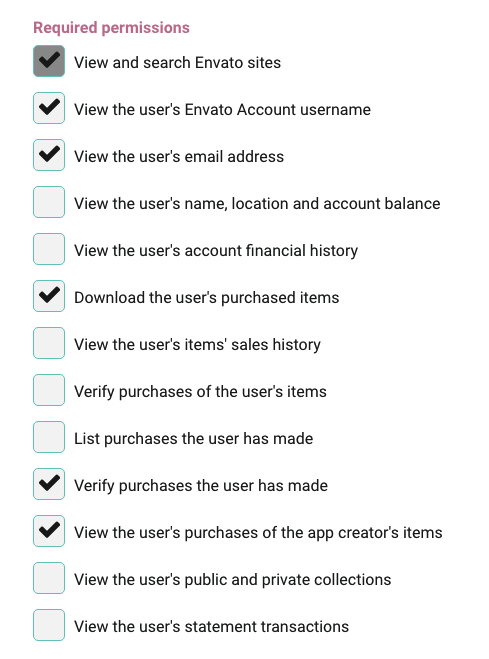
- Verify purchases of your items: An important one, it allows us to verify purchase codes.
- View your items' sales history: For whatever reason, this was also required to verify purchase codes.
- View your account profile details: This is required to grab the first and last name on the account.
- View your email address: This is used to grab the email associated with the account.
- View your Envato Account username: This is used to grab the Envato username.
- Once connected you will be taken back to your Settings screen and your Envato username should be showing, along with Reconnect and Disconnect buttons. If you see these, step one is complete!
ADD YOUR ENVATO PRODUCTS:
- Go to your Ticksy Manage Categories page. This is located under the gear icon in the header bar (when logged in as an administrator).
- If you already have categories created and there are tickets submitted to those categories, you can simply choose the Envato product associated with that particular category from the dropdown to the right of the category name.
- If you haven't created your categories yet, the easiest way to do this is to go to the Add Envato Category tab and add them all at once.
- You can/should rename the categories from here as well to simplify them. An example of this would be to change something like "SuperMag - A Responsive Creative Magazine WordPress Theme" to something like "SuperMag WordPress Theme" so your customers can quickly find the correct category.
ENABLE CUSTOMER VERIFICATION
- To complete this Envato connection, you want to Enable Envato Customer Verification. Head back over to your System Settings page and click on the Envato Integration tab again.
- Click the Enable Envato Customer Verification option to display detailed instructions.
- Follow these instructions to the letter. Be sure to View Required Permissions and use exactly what is show there when creating your Envato App.
- Also, be sure to use the exact Confirmation URL that is provided. It needs to include "?ref=envato" in the URL.
- During this process you will be given a Client ID and a Secret Application Key. Copy these down somewhere so you don't forget, especially the secret key, as that is only shown once. The Client Key will be the name of your app with a random string of characters after, like this: my-envato-app-w79y1azq. You need to include all of that.
- Once you have those entered, you can choose which items you want to require verification for (Ticket Submission, Viewing Articles, Viewing Public Tickets) and save your settings.
And you're done! Your customers will be able to Login with Envato now to verify their purchases with you.
There are a few shortcut keys you can use when replying to a ticket:
R — When viewing a ticket, tap the "R" key to bring up the reply window to start replying.
N — When viewing a ticket, tap the "N" key to bring up the note window to create a new note.
ESC — When viewing a ticket, tap the "ESC" key to hide either the reply or note box. "ESC" will also hide the search bar if it's open at the time.
⌘CMD / CTRL + RETURN / ENTER — When you're ready to add a comment or note to a ticket, tap "⌘CMD + RETURN" on a Mac or "CNTRL + ENTER" on a PC to submit the form.
Follow this quick guide to activate Pushover notifications:
- Go to https://pushover.net/ and click Login or Signup in the upper right.
- If you have an account, sign in. If not, create one.
- Once you're signed up/signed in, you will see your User Key on the right: http://boxy.d.pr/1gQkF
- Copy the User Key to your clipboard.
- Go to your Profile (Gear > Profile), activate Pushover Notifications and paste your User Key into the text field.
- Purchase and download the Pushover app from the Apple/Android app store.
- Sign in to your account in the app and Pushover notifications should begin working!